The Project
For this project we first started by doing several labs having to do with electricity, circuits, breadboards, Arduinos, and coding. When doing the labs on coding we took notes on the code writing down what code did what on the breadboard. After we finished the nodes me and my partner Matt decided that for our final project we would make and code a chain of LEDs that were activated by either pressing our holding a button. We took multiple pieces from other codes and added sections that we needed to create a code that did what we wanted. We also set up the board with the LEDs, Button, and resistor that we needed to make the chain work with the code.
Evidence of Work
|
|
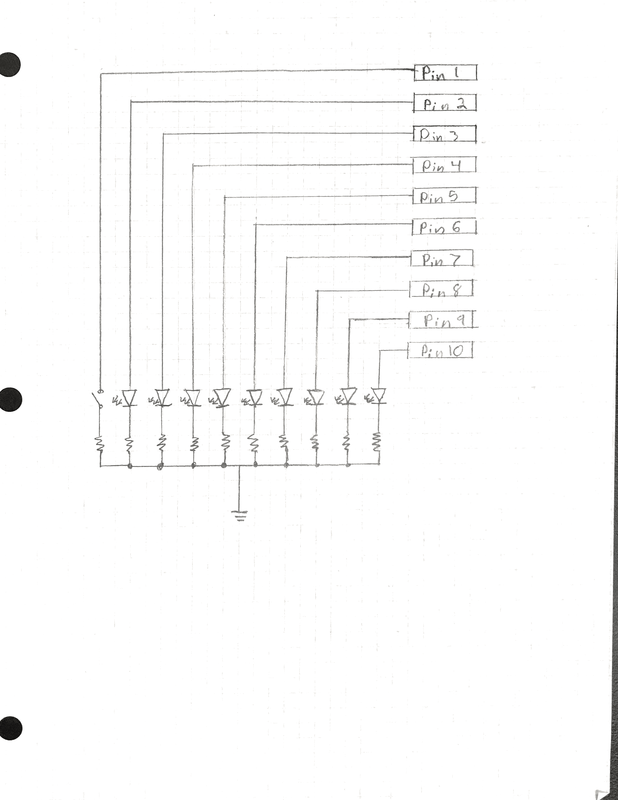
The circuit diagram on the left details where all of the wires, resistors, LEDs, and Button connect to the board.
Code
//For our circuit we made a light chain that gets activated
//when you press the button down. If you hold the button the
// Light chain continues untill you let go of the button.
int ledPins[] = {3,4,5,6,7,8,9,10}; // chooses what pin the LED's go into
int button1Pin = 2; //lets you choose which pin the button goes into
void setup() // A setup function that run once the sketch starts
{
int index;
for(index = 0; index <= 7; index++)
{
pinMode(ledPins[index],OUTPUT); // states that leds are outputs
}
}
void loop()
{
if(digitalRead(button1Pin) == LOW){
oneAfterAnotherLoop(); } // chooses oneAfterAnotherLoop as designated light pattern
}
void oneAfterAnotherLoop() // Set up for light pattern
{
int index;
int delayTime = 100; // Delay time in millaseconds
for(index = 0; index <= 7; index++)
{
digitalWrite(ledPins[index], HIGH); // states is light is on
delay(delayTime);
}
for(index = 7; index >= 0; index--)
{
digitalWrite(ledPins[index], LOW); // states that light is off
delay(delayTime);
}
}
This is te code that we used to activate and use the arduino circuit.
Content
Circuits: An electrical circuit is a complete loop of conductive material from positive to negative sides of a power source.
Series: A series circuit is a closed circuit in which the current follows one path.
Parallel: A parallel circuit is a closed circuit which the current divides into two or more paths before recombining to complete the circuit.
Current: The flow or charge of electricity through a circuit.
Resistance: A measure of difficulty for an electri current to pass through a conductor.
Voltage: Potential energy difference across a componet in a circuit.
Breadboards: a board for making an experimental model of an electric circuit.
Coding: the process of assigning a code to something for the purposes of classification or identification.
Reflections
This project was very challenging and it was very grueling to go through lab after lab then read through so many lines of code, but after we were done with all of that and we got to make our own Arduino project it got much more fun and in the end I really learned a lot. My low point of this project was just going through all the labs and packets. My high point was probably actually learning how to set up a breadboard to work with the coding that had already been done.
